Wednesday, March 31, 2010

Mexican Lasagna

This is one of the “go to” recipes in our house.  When I can’t think of what else I want to make, I know this is a winner.  Freezes well too.  Recipe is from Kraft Foods and All Recipes.com.

Ingredients:

-1 pound lean ground beef

-1/2 cup chopped onion

-2.5 cups Thick and Chunky Salsa (I like Pace) – this is where you control your heat.  If you don’t like hot, use Mild sauce.

-1 (11 oz) can whole kernel corn, drained

-1 tsp chili powder

-1 tsp ground cumin

-12 (6 inch) corn tortillas (if using flour, you only need 8)

-1 (16 oz) container Cottage Cheese

-1 cup shredded cheese


Directions:

1.  Preheat oven to 375 degrees.  Brown meat and onion in large skillet on medium heat; drain.  Return meat to skillet.  Add salsa, corn and seasonings; mix well.

DSC_0242

2.  In a lightly sprayed 13x9” baking dish, layer one third of the meat mixture

DSC_0243

and one half each of the tortillas (I overlap them a little in the middle and run them up the sides of the dish)

DSC_0245

and cottage cheese. 

DSC_0247

Repeat layers; cover with remaining meat sauce.  Sprinkle cheese over top.

DSC_0249

3.  Bake 30 minutes or until heated through and bubbling.

DSC_0251 

 DSC_0254

This one gets even better the longer the leftovers last!

Saturday, March 20, 2010

Baked Club Sandwich Rounds

It’s been a rough weekend in the Naptime household.  My 15 month old daughter has had a fever for a couple days.  It might not sound like a big deal to most “veteran” mothers out there, but this is her first illness or fever in her little life!  It’s been hard to watch her not feeling well.  So, here is a very quick and very easy dish to go along with the little time and little sleep I’ve had over the last couple days.  This makes a great dinner or quick lunch too.  Recipe from Pillsbury.

Ingredients:

-1 (11oz) can Pillsbury Refrigerated Crusty French Loaf

-1 cup shredded cheese

-2 oz thinly sliced cooked deli turkey

-2 oz thinly sliced cooked deli ham (I just use the little packages in the cold cut section at the store)

Directions:

1.  Heat over to 350 degrees.  Spray cookie sheet with nonstick cooking spray

2.  Unroll dough. 

DSC_0287

Sprinkle cheese over dough.  Top with turkey and ham (I did it opposite – it really doesn’t matter). 

DSC_0288

Starting with the long side, roll up dough; press edges to seal. 

DSC_0290

Make 3 to 4 slits in top of loaf (important!  if you don’t do it, all the cheese will ooze out since there are no vents for the steam).  Place on sprayed cookie sheet, seam side down.

3.  Bake at 350 for 23 to 28 minutes or until golden brown.  Cool 5 minutes.  Cut into 1 inch diagonal slices.

DSC_0291

This is always a crowd pleaser!

DSC_0298

DSC_0299

Wednesday, March 17, 2010

Slow Cooker BBQ Beef . . .and an Apology

So, I’ve been busy.  It’s true.  But that’s no excuse for not posting in over a month!  I’m sorry.  I’ve been busy launching a website for my little home business, Milk & Honey (www.milkandhoneytexas.blogspot.com), the hubby and I went to California for 4 days without the kidlet (Yippee!!), and I’ve been running all over Creation while all my friends are out on Spring Break.  However, I finally found the time to get this long promised BBQ recipe up. 

This is from www.bettycrocker.com.  The BEST tasting BBQ beef that I’ve ever made!

Ingredients:

-3 lb beef boneless chuck roast

-1 cup barbecue sauce

-1/2 cup peach or apricot preserves

-1 Tbsp Dijon Mustard

-2 tsp packed brown sugar

-1 small onion, sliced

1.  Trim excess fat from beef.  Cut beef into 4 pieces.  Place in slow cooker.

2.  Mix remaining ingredients; pour over beef.  Cover and cook on low heat setting 7 to 8 hours or until beef is tender.

DSC_0320

(Sliced onions – quick note.  I NEVER put onions in anything that I cook because we aren’t fans in this house.  But the onions in this recipe get really soft and caramelized and make this dish wonderful!)

 DSC_0322

Before . . .

DSC_0363

. . . and after.  Yum!

The night that I made this, we used the beef and made quesadillas.  All you need to do is put a burrito sized tortilla in a skillet with a little cooking spray, fill the middle with cheese and beef, fold over and brown on both sides.

DSC_0364

Paired with the coleslaw from the last post.  Don’t you love the “vintage” plate from my Mom?  Didn’t we all grow up eating off of those plates?

Friday, February 19, 2010

The BEST Cole Slaw you will EVER eat!

No, really!  Now, I like cole slaw and all, but this made me LOVE it.  I made 2 batches of this and we ate it all within a week.  It was so good that we were still snacking on it at 8:00pm!!  This is an adapted recipe from Food Network for “Broccoli Cole Slaw.”


Ingredients:

-2 bags Ramen Noodles in Oriental flavor (you can use whatever you have on hand, but this flavor tastes the best in this recipe)

-1/2 stick of butter

-1 bag (12 oz) cole slaw in the bagged salad section of the supermarket

Dressing:

-1/2 cup canola (or vegetable) oil

-1/4 cup brown sugar

-1/4 cup apple cider vinegar

-1 Ramen Noodle seasoning packet


Put the Ramen noodles in a bag and crush them with a rolling pin while melting butter in a large skillet over low/medium heat (you want them to be in small chunks).  Add the crushed noodles and sauté, stirring occasionally.  You can take them off the heat just before they start to brown. 

DSC_0323

Meanwhile, whisk together all the dressing ingredients in a small bowl.  Place the shredded cole slaw into bowl and toss with noodles and salad dressing.  Refrigerate several hours before eating.


So good!  This will be great in the summer.  I just happened to make it on the day we got 13” of snow but it was tasty with some BBQ Beef Quesadillas (recipe to come soon).

 DSC_0324

Wednesday, February 10, 2010

Acorn Squash 101

I LOVE Acorn Squash.  I thought more people ate it and enjoyed it as much as we did until the lady at the grocery store quizzed me about how to cook it and what it tasted like.  So I thought I would do a quick little lesson on how to cook and really enjoy Acorn Squash.  It has a long cooking time, but is easy to prepare and perfect for any time of year!

Step 1:

DSC_0278

Choose your acorn squash.  We generally eat one half per adult.  I usually buy 2 and cook them all one night so we can just microwave the leftovers the second night.  Cut your squash in half, starting at the bottom end with a large kitchen knife.  The top is usually pretty tough to cut through, so if you start at the bottom and get most of the way through you can finish pulling it apart by hand.

Step 2:  Spoon all the “guts” out of your squash.  It should be nice and clean like the bottom picture when you are done.

DSC_0280

DSC_0284

Step 3: Place your squash cut side down in a lightly greased pan (can be glass or metal, doesn’t matter).  Cook at 350 degrees for 30 minutes.  Then turn them over and cook another 20 minutes.

DSC_0286

Step 4: While squash is cooking, have your “assistant” take out EVERY piece of Tupperware that you own.  This is very important.

DSC_0281

Step 5: Remove from oven and top as you wish.  You can use butter, maple syrup, brown sugar, etc. (these have butter melting in them already – YUM!)

DSC_0292

And now a montage of brown sugary goodness!

DSC_0294

DSC_0300

(This is usually how I serve it.  I start to mush up the inside with my fork to get it started.  As you eat it, you’ll scrape the flesh from the inside of the rind and top with more brown sugar as you like!)

Saturday, February 6, 2010

White Cheddar Mac & Cheese

DSC_0251

What is better than a big pan of Mac & Cheese?  I love this recipe because it also has peas and ham in it so you get a little veggie with it too.  White Cheddar is pretty rich so this meal lasts several nights.  I found this recipe in Southern Living Magazine.

Note: I can NEVER find White Cheddar cheese already shredded.  The “Cabot” blocks in the picture below are the only ones I can find at the store.  I buy two 8oz packages and shred it by hand.  If you do this, set the cheese out to come to room temperature about 15-20 minutes before you shred it.  Makes it MUCH easier to shred!

DSC_0249

Ingredients:

-1 pound Farfalle pasta

-2 Tbsp unsalted butter

-2 Tbsp flour

-2 cups milk

-1/2 tsp salt

-1/4 tsp black pepper

-1/4 tsp ground nutmeg *see note below*

-1 pound white cheddar cheese, shredded (about 4 cups)

-1 package (10 oz) frozen peas, thawed

-1/2 pound finely diced smoked ham

1.  Heat oven to 350 degrees.  Coat a 9x13 baking dish with nonstick cooking spray.  Cook pasta in lightly salted water following package directions, about 12 minutes.  Drain.

2.  While pasta is cooking, melt butter in a medium-sized, heavy-bottomed saucepan (not nonstick) over medium heat.  Stir in flour until well blended; cook 1 minute.  Whisk in 1 cup of milk and cook, whisking continuously, until smooth.  Whisk in remaining 1 cup milk and continue to cook, whisking until thickened and smooth, about 5 minutes.  Remove from heat; stir in salt, pepper and nutmeg (**I do not have nutmeg in the house, so I use Pumpkin Pie Spice.  You can’t really taste any of it in the final dish anyway so you can omit it completely if you want to**).  Whisk in 2 cups of the cheese until smooth.

3.  In a large bowl, mix together the pasta, cheese sauce and 1 cup of the remaining cheese.  Stir in the the peas and ham.  Pour into prepared baking dish.  Scatter remaining 1 cup cheese evenly over the top.DSC_0254
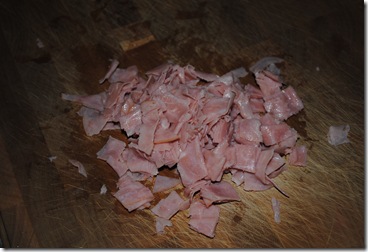
--I don’t have the patience (or memory) to thaw my peas beforehand, so I put my frozen peas in a glass measuring cup and fill with water.  Break them up with your fingers a little bit and let them sit in the water for a couple minuets.  They will thaw out enough for the recipe!--

DSC_0255

4.  Bake at 350 degrees for 30 minutes or until bubbly.  Remove from oven; allow to cool 10 minutes.  May be served warm or at room temperature.
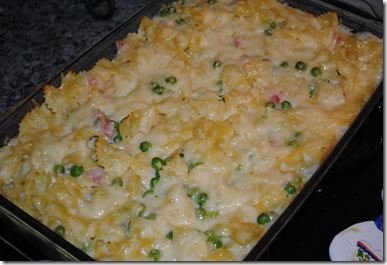
DSC_0257DSC_0258

We added some Rosemary Focaccia – yum!

DSC_0253

Wednesday, February 3, 2010

Parking Lot Cookies

So I’m not sure where the name came from or even where the recipe came from, but these cookies are DELICIOUS!  They are quick and easy and can be made mostly from what you have in your pantry.  I made them because my husband has been on a Rice Krispie Treat kick and after making 4 batches of them in a week and a half, I needed something else to do with the Rice Krispies! 

Ingredients:

-1 c shortening

-1 c white sugar

-1 c brown sugar

-2 eggs, beaten

-1 tsp vanilla

-2 c flour

-1 tsp baking soda

-1/2 tsp baking powder

-2 c oatmeal

-2 c Rice Krispies

-1 c chocolate chips

Preheat oven to 350 degrees.  Mix both sugars well, removing all lumps.  Add shortening, baking soda, baking powder, vanilla and beaten eggs.  Mix well.  Mix in flour.  Mix in chocolate chips.  Mix in oatmeal (starting to get thick – may want to start mixing it by hand).  Mix in Rice Krispies.  Roll up into teaspoon sized balls and mash with fork.  Place on bottom rack in oven and bake about 8 minutes or until bottoms of cookies start to brown.  Move to top rack for another 3 minutes or until lightly brown.  Cool.

DSC_0235

DSC_0236

LinkWithin

Related Posts with Thumbnails