Wednesday, October 13, 2010

Hash Brown Potato Casserole

Okay, so there isn’t really anything special about this recipe as far as Hash Brown Casseroles go.  I think this is just the first one that I actually tried.  I halved this recipe because I wanted it for just 2 nights and it worked out perfectly.  The whole recipe probably has about 9 servings to it.  Recipe from the cookbook “Family & Friends Favorite Recipes” by Margaret and Branson Gayler (it was a gift to us from missionaries that stayed with us).

Ingredients (whole recipe):

-2 lbs frozen hash brown potatoes

-1.5 cups grated cheddar cheese

-1 can cream of chicken soup

-2 cups sour cream

-1/2 c (1 stick) butter

-1 medium onion, chopped

-Salt and pepper to taste

-2 cups Ritz crackers, crushed

-1/2 cup melted butter

Directions:

1.  Preheat oven to 350 degrees.  In a large bowl, combine the potatoes, cheese, soup, sour cream, butter, onion and seasoning.

2.  Place in a buttered 13x9” pan and bake for 35 minutes (if halving recipe, place in an 8x8” dish).

3.  Remove from oven and top with crushed Ritz crackers mixed with melted butter.  Bake for another 10 minutes.

DSC_0105

Monday, October 11, 2010

Meal Planning Monday and A Change of Direction

Consider this my leap head-first back into the world of blogging.  It was a great break while I felt gross in my first trimester but I have missed you all and am ready to get back to it!  First, let’s be honest.  I’d like to tell you that I’m going to have a ton of crafts coming up . . . but I’m not.  I am up to my eyebrows in crochet work that needs to be done – orders for my business, baby showers, birthdays, Christmas, the list goes on.  Plus one of these days I’m going to finish the stupid T-shirt quilt I started a YEAR ago and make curtains for our bedroom.  SO, having said that, I will give you some crafts every now and again, but mostly we’ll be talking recipes for the next few months (until at least Christmas).

I know a lot of you are super expert meal planners.  And some of you are not.  I consider myself somewhere in the middle but I hope some of my little tricks will work for you!  I used to plan meals just one week out but am trying two weeks now instead.  Every other Monday I’ll be sharing my menu with you.  Recipes that have already been shared on the blog will be highlighted and linked.  New recipes (if they are worth keeping!) will be shared during that two week period.

To start my meal planning, I sit on the kitchen floor next to my recipe cabinet and start looking.  I ask my husband if he has any requests or anything he’s been craving before I get started.  Typically, meals will last at least 2 nights for us, sometimes 3.  As we have those meals, I’ll usually write down how many servings it lasted (i.e. if it lasted 3 nights, it’s 9 servings between the 3 of us).  I think this is easier than writing down how many nights it lasted because as our family expands, the fewer nights they will start to last!  Typically that makes 5 meals for 2 weeks (I don’t count Sundays because we eat a late lunch after church and usually just snack for dinner).  I try to pick at least one beef, one chicken, one other (fish, pasta, etc.), at least one slow cooker and at least one soup.  Once I have my main meals, I pick sides.

Here is the menu for October 11 through October 24:

Monday/Tuesday – Hot dogs, Coleslaw, Hashbrown Casserole (new)

Wednesday/Thursday/FridayItalian Pot Roast (new), green salad, mashed potatoes, Jordan rolls (new)

Saturday/Monday – Beef tacos, Mexican rice, refried beans

Tuesday/WednesdayCrab Topped Tilapia Fillets (new – can’t WAIT to try this one!), Lemony Roasted Veggies with Couscous (new)

Thursday/Friday/SaturdayKing Ranch Chicken (new), Zucchini

Trying a lot of new recipes this week.  I haven’t really “cooked” anything much in the last 3 months so I’m ready to get experimenting again! 

My other change is that unless the steps are rather complicated (like the rolls will be), I’m only going to take pictures of the final outcome of the dish.  I also commit to try to get better, prettier pictures of the food for you.  I usually just scoop something out and run it to the table before my daughter pitches a fit to get eating.  I’ll try my best to get some better shots.

I hope this menu inspires you and I hope to see you back in the next few weeks to enjoy these recipes with me!

Monday, October 4, 2010

Fall Decoration Inspiration

Oh, what a wonderful week of vacation we had!  My husband and I slipped off to Las Vegas for 4 days while the little one and the puppy stayed at my parent’s house.  Of course, we left beautiful 80 degree weather in Dallas behind for the glory of 105 degrees in Vegas.  But with the help of the monorail and experience, we survived!  My legs were aching and it took us a few days to recover, but we had a great time.

I wanted to share just a few pictures with you.  The Bellagio is our absolute favorite place in Vegas.  It is just so gorgeous.  We spend every evening with a cup of gelato and a few hours watching the fountains.  If you haven’t been, they have a beautiful conservatory that is decorated for the season.  They had such wonderful fall decorations that I think we can all be inspired by!

DSC_0130 DSC_0131 DSC_0133 DSC_0134 DSC_0137 DSC_0138 DSC_0158

Friday, September 24, 2010

Sour Cream Mashed Potatoes . . . And A Little Time Away

I haven’t been present on here lately and I’m sorry.  We’ve been working on a major project here that’s taken up a lot of our time and energy.  I’ll talk about that when we get back . . . from vacation!!  The hubs and I are headed to Las Vegas next week for a few days by ourselves.  We don’t drink and we don’t gamble but we love the food and the people watching in Vegas.  We’ll miss our sweet little one a ton, but it’s definitely time for a little break.  So I hope you enjoy this recipe and I’ll see you when we get back!

This recipe is from my Mother-in-law in South Carolina.  So I’ll start by saying that you shouldn’t expect this dish to be terribly healthy but expect lots of flavor!  My husband raved about these potatoes until I asked her for the recipe.  Now we get to enjoy them whenever we want.  So great!  Would make a great alternative to the plain ole mashed potatoes for the holidays too.  (And if you don’t like cottage cheese, don’t let that scare you off of this dish – you can’t taste it in the final product).

Ingredients:

-6 cups of potatoes, diced and cooked (I usually use 3 large baking potatoes)

-8 oz sour cream

-16 oz cottage cheese

-1 Tbsp grated onion

-2 tsp salt

-1/2 stick butter

Directions:

1.  Drain cooked potatoes, add butter.  When butter has melted, mash with potato masher or in mixer.  Add all other ingredients and place in a 3 qt casserole dish sprayed with cooking spray.

2.  Bake uncovered in a 350 degree oven for 30 minutes.

DSC_0234

Monday, September 20, 2010

Pottery Barn Inspired Flags

I’ve started to get friends asking me to sew things for them.  It’s one of those moments of studying a picture and thinking, “Okay, can I really do this?  Can I make it look anything like that?  Can I do it without it looking silly?”  My friend Jeni, whom I’ve known since the 6th grade, was expecting her second child and sent me this picture:

untitled She bought the race car bedding from Pottery Barn kids and wanted the flags but they didn’t sell them anymore.  I figured it was just a little hemming and took on the project.  I’m so glad that I did!  It was super easy and I’m pleased to share the tutorial with you!  For this tutorial, we are doing a red flag instead of the yellow.

Materials:

-The fabric for this is canvas.  We bought fabric from www.fabric.com and the canvas was more of an outdoor type of canvas – it had a plastic feel to it.  You can also use the cotton canvas as well. 

You will need 1 yard each of red, blue, and white fabric and 1/2 yard of black

-Grommets (12) and grommet tool – of your size and choosing

-Scissors/fabric cutter, thread, etc.

Directions:

1.  The flags measure 22” wide by 33” long.  I did not need to hem my fabric since the plastic feel of the canvas prevented it from fraying.  If you need to hem, just leave yourself seam allowances and cut your fabric to size.  You’ll cut flags of this size in blue, red, and white.
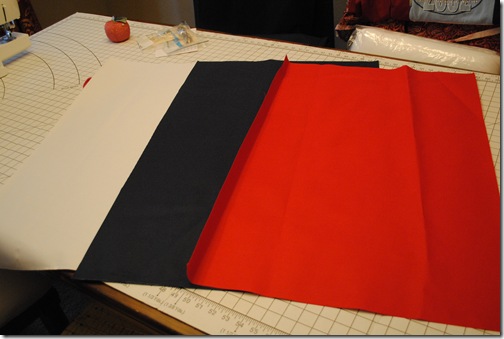
DSC_0046

2.   Let’s start with the checkered flag because I like to get the most complicated out of the way first!  The black squares will be sewn onto the white flag.  Cut 10 squares 5.5 x 6.5 inches.  Then you will lay them out in the following pattern:

DSC_0047Leave a 1” strip at the top and bottom of the flag.  This will be for your trim where the grommets will go.  Once you are happy with the placement, sew in place.

3.  Next is the flag with the diagonal stripe (blue flag, red stripe).  With your red fabric, cut a piece 5” wide by 41” long.  Lay on your flag and trim as needed.  Sew into place.

0048

4.  Next is the trim for all of the flags.  You will need to cut 6 pieces of white fabric 2” wide by 22” long.  This will allow you 1” on each side, folded over the end of the flag (so you have 1” on each side of the flag).  If you are using a plastic canvas, fold each piece in half lengthwise to give you a guide as to where to pin on your flag.

159 Then place on the short ends of each flag and sew into place along all 4 sides (both long ends and the sides).  You should be able to sew both sides at once.
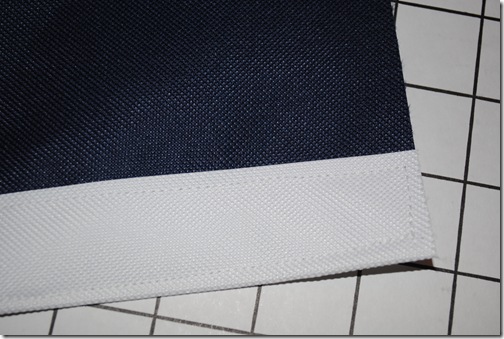
DSC_0161

5.  This is where you should be at this point with all four flags:
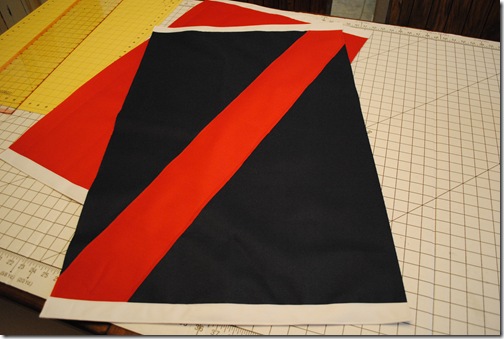
DSC_0160 On to the grommets.  Some grommet tools are fancy and will do the cutting for you.  The one we got on fabric.com was not.  It was 50 cents and you basically cut the hole and then hammered the stew out of it until the grommet bent over the fabric.  So I had to cut my own holes. 

Grommets are placed 1” in from the end of the flag.

163Make a mark then cut your hole and make sure the inside of the grommet fits in the hole.

165Then use your grommet tool to attach the grommet . . .
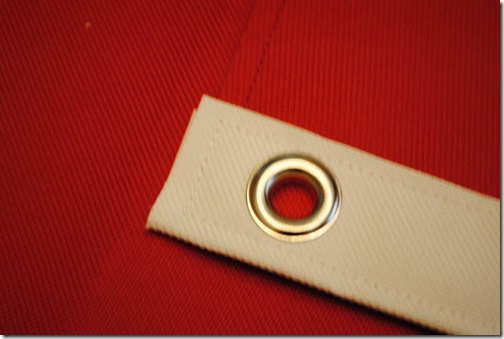
164 . . . finish with each flag.

Finished product:

DSC_0213

Jeni had her little boy’s name embroidered on the red flag.  Here they are in the room:

finished flags       finished flags 2

I love them!  All done for much less than they would have been at Pottery Barn Kids.  Maybe we’ll have a little boy next time around and I can make these cute flags for myself. :)

Friday, September 17, 2010

Cheesy Tomato Beef Bake

This recipe is described as “a warm sandwich you eat with a fork.”  A great summer recipe and a really great way to use up those last tomatoes of the season.  I will say that you need to like sour cream and mayonnaise to enjoy this recipe.  From Betty Crocker.

Ingredients:

-1 lb ground beef

-1 tsp chili powder

-1 cup sour cream

-2/3 cup mayonnaise

-1 cup shredded cheese (I used a cheddar blend)

-2 Tbsp finely chopped onion

-2 cups Bisquick mix

-1/2 cup cold water

-2 to 3 medium tomatoes, thinly sliced

-3/4 cup chopped green bell pepper (optional)

Directions:

1.  Heat oven to 375 degrees.  Spray 13x9 inch pan with cooking spray.  In skillet, cook beef and chili powder over medium-high heat, stirring occasionally, until thoroughly cooked; drain.  Set aside.

2.  In small bowl, mix sour cream, mayonnaise, cheese and onion; set aside.

3.  In medium bowl, stir Bisquick mix and cold water with fork until soft dough forms.  Using fingers dipped in Bisquick mix, dress dough in bottom and 1/2” up sides of pan.  Layer beef, tomatoes and bell pepper on dough.  Spoon sour cream mixture over top; spread evenly over vegetables to cover.

4.  Bake uncovered 25 to 30 minutes or until edges of dough are light brown.

DSC_0239

DSC_0244


badge

New Friend Fridays


Get Healthy Cheap

Foodie Friday

Friday Favorites

Friday, September 10, 2010

Deli Rotisserie Chicken – Spice Blend

One of the gifts that we got when we got married was a “Baby George” George Foreman Rotisserie Grill.  I thought, “we will NEVER use this.”  One day we finally pulled it out and decided to cook a chicken on it.  Oh my goodness, it was fabulous.  It tasted just like those yummy ones you get from the deli.  We also have an outdoor grill with a rotisserie attachment that we use sometimes.  If you have something to rotisserie a chicken on (or just cook one in the oven), this is the BEST spice blend.  From the George Foreman recipe book that came with the rotisserie.  To be used on a 4 to 5 pound whole chicken (we remove the skin first).

Ingredients:

-1 tsp salt

-2 tsp paprika

-1 tsp chili powder

-1 tsp garlic powder

-2 tsp black pepper

-1 tsp onion powder

-1 tsp dried thyme

Mix together and rub on chicken.

DSC_0216

Here’s the chicken in the Baby George.  I do like the countertop convenience of it but it’s tough to clean.

DSC_0218

The finished product!  So yummy – doesn’t it just make your mouth water?

DSC_0232


badge

New Friend Fridays


Get Healthy Cheap

Foodie Friday

Friday Favorites

LinkWithin

Related Posts with Thumbnails