Monday, September 26, 2011

Chicken Enchilada Quiche

If you haven’t noticed by now, I like meals that include pie crust.  It’s probably not the healthiest option, but I like the “pie” aspect and it’s easy and fun for everyone to eat.  Make it Tex-Mex and I’m in.  Recipe from Pillsbury.

Ingredients:

-1 refrigerated pie crust, softened as directed on box

-4 eggs

-1 cup milk

-1.5 cups cooked chicken, shredded

-1.5 cups broken tortilla chips

-2 cups shredded Monterey Jack cheese

-1 cup shredded Cheddar cheese (I just used 3 cups Cheddar instead of the two cheeses)

-1 cup Salsa

-1 (4.5 oz) can chopped green chiles (optional)

-1/2 tsp salt

-Pepper to taste

Directions:

1.  Heat oven to 350 degrees.  Place pie crust in 9” glass pie pan as directed on box for One-Crust Filled Pie.

2.  In medium bowl, beat eggs with whisk until blended.  Beat in milk.  Stir in chicken, chips, cheeses, salsa, green chiles and salt.  Pour into crust-lined pan.  Sprinkle pepper over top of filling.

3.  Bake 55 to 65 minutes or until crust is light golden brown and knife inserted in center comes out clean.  Let stand 10 minutes before serving.  Cut into wedges.  Serve with sour cream and/or salsa if desired.

DSC_0021

Tuesday, September 20, 2011

Tex-Mex Surimi Rice Salad

We love surimi (imitation crab) so I definitely wanted to try this recipe.  It’s so-so as a side dish but would be wonderful wrapped in lettuce as a little finger foods.  Next time we try this, we’ll wrap the rice in iceberg lettuce leaves (a la PF Chang’s) and go to town!  Recipe from Family Circle Magazine.

Ingredients:

-3 Tbsp lime juice

-2 Tbsp olive oil

-2 Tbsp sour cream

-1/4 tsp chili powder

-1/4 tsp ground cumin

1/8 tsp black pepper

-2 packages (8.8 oz) each fully cooked microwaveable rice (such as Uncle Ben’s)

-3 wedges Laughing Cow Light Queso Fresco & Chipotle Cheese

-1/2 pound surimi (imitation crab), cut into bite-size pieces

-1/2 green bell pepper, core and seeds removed, finely diced (optional)

-2 scallions, thinly sliced (optional)

-1 head green leafy lettuce or iceberg lettuce

Directions:

1.  In a small bowl, whisk together lime juice, olive oil, sour cream, chili powder, cumin and pepper.  Set aside.

2.  Heat rice in microwave following package directions, about 2 minutes; add to a large bowl.  Add cheese and stir until melted.  Stir in surimi, green pepper and scallions.  Add lime juice mixture and stir to coat all ingredients.

3.  Serve rice salad with lettuce leaves for wrapping.  Squeeze with lime wedges, if desired.

DSC_0002

Wednesday, September 14, 2011

Dryer Sheet Wreath Tutorial

If you haven’t seen it yet, please check out my beautiful new laundry room HERE!  We re-did it just a few weeks ago and it turned out so pretty.  It makes me happy to do laundry . . . well . . . okay, I wouldn’t go that far but it makes the chore much more tolerable!

This is one of my favorite parts of the re-do:

3702I made this wreath for FREE!  The tutorial is below.  Enjoy!

Materials:

-Used dryer sheets.  You are going to need a LOT.  I saved up for probably 3 or 4 months before I had enough to make this wreath.  Just keep them somewhere off to the side until you have probably at least 75 to 100.  I know that sounds crazy but the fuller the wreath, the more you will need. 

-Wire hanger

Directions:

1.  Bend your wire hanger until it is the shape of a circle.  If you have a thin enough hanger, you can do this by hand but you may want to use some pliers to straighten it out.

  DSC_0021 2.  Take a dryer sheet and fold it in half. 

DSC_0022Then you want to put the wire hanger on top of the dryer sheet and fold the top over the hanger, then pull the bottom ends through.  You are simply knotting the dryer sheet onto the hanger.  This project works best with USED dryer sheets.  They are MUCH easier to use than new ones.

Here is how your knot will look.
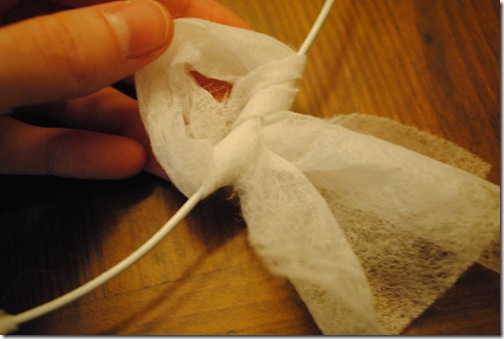
DSC_0023 3.  Pull the open ends (to the right) of the dryer sheet until your knot is tight on the hanger. 
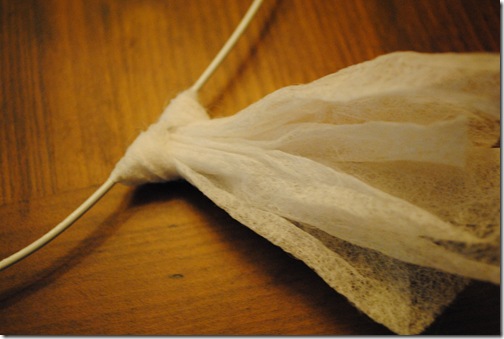
DSC_00244.  Repeat with all dryer sheets.  As you work, pull the dyer sheets up toward the front of your wreath so that the knots are in the back.

DSC_0025 You want to make sure and squish each dryer sheet nice and close to the one before it.  The tighter the dryer sheets are to each other, the fuller your wreath will be.

5.  When finished, bend the hook end of your hanger down and behind the wreath to form a place for your nail to go to attach to the wall.  It doesn’t have to be pretty because it will be hidden behind the dryer sheets.  I bent mine down into a loop.

Here is your finished project!

DSC_0373 You can see that some of my dryer sheets have a little color to them.  It’s up to you if you want to use those or not.  The sheets for our master bed still run a little when I was them, even though we’ve had them for several years.  I like the little bit of color that it adds to the finished wreath. 

I hope you get a chance to make this nice, FREE project!  Please let me know if you have any questions!  Enjoy!

Wednesday, August 31, 2011

Baked Spaghetti

This is the first recipe I think that I can ever claim as my own.  It’s so simple but it was so good that I don’t think I’ll ever make regular spaghetti again!  The best part is the cheese layer in the middle – makes it so yummy.  Enjoy!

Ingredients:

-2 (14.5 oz) cans diced tomatoes with oregano and basil, with juice

-12 oz spaghetti (I use angel hair), cooked and drained

-1 pound ground beef, browned and drained

-2 cups (8 oz) shredded cheddar cheese

Directions:

1.  Preheat oven to 350 degrees.  Spray a 13x9 baking dish.  Cook spaghetti per directions on box.  Cook beef until no longer pink; drain.  Add tomatoes and sprinkles of salt, pepper, oregano, onion and garlic powder (to taste).  Heat through.

2.  Place half of the cooked spaghetti in baking dish.  Top with half of beef mixture and half of cheese.  Repeat layers.

3.  Bake, uncovered, at 350 for 15-25 minutes or until cheese is melted and lightly browned.

DSC_0112Admittedly, it’s not the best picture but it tastes SO good!

Friday, August 26, 2011

Zucchini Chips

Sorry for the long absence.  It’s been a little crazy around here plus we were able to get away for a quick vacation.  Hope everyone is doing well and ready for a nice weekend!

I’m always looking for an interesting way to incorporate vegetables into our meals.  With a husband less-than-fond of veggies and a suddenly picky toddler (who was always a good eater before), the challenge is on.  I saw this tip in Family Circle Magazine and gave it a try.  It was a HUGE hit.  Add a little Ranch dressing for dipping and you are in business!

Ingredients:

-Zucchini – I used 1 medium-sized and it filled an entire tray for baking

-Milk

-Italian-seasoned Panko or bread crumbs

Directions:

1.  Slice zucchini very thinly.  The thinner, the better.  Use a mandolin if you have it.

2.  Dredge zucchini slices in milk and then cover in bread crumbs.

3.  You can either bake these in a 375 degree oven for 30 minutes or until golden or put under the broiler under golden.  Keep an eye on them – when you slice them thinly they can quickly go from golden to burnt!

DSC_0013

Tuesday, August 2, 2011

California Cheeseburger Pie

Anything with melted Velveeta in it is aces in my book!  This looked yummy so we thought we’d try it.  Again, no points for health on this one but it sure was yummy!  The ingredients don’t sound like they go together but it really combines for a yummy treat.  Recipe from Pillsbury.

Ingredients:

-1 box refrigerated pie crusts, softened as directed on box

-1.5 lb ground beef

-2 large onions, chopped (I just used one)

-12 oz Velveeta, cubed

-1/2 cup Thousand Island dressing

-2 tsp yellow mustard

-16 round dill pickle chips or 8 oblong dill pickle slices

-1/4 tsp sesame seed (optional)

Directions:

1.  Heat oven to 375 degrees.  Make pie crusts as directed on box for Two-Curst Pie using 9” pie plate.

2.  In skillet, cook ground beef and onions over medium-high heat, stirring frequently, until beef in thoroughly cooked; drain.

3.  Stir in cheese, dressing and the mustard.  Reduce heat to low; cook 2 to 3 minutes, stirring constantly, until cheese is melted.  Spoon beef mixture into crust-lined pie plate.  Arrange pickle chips over beef mixture.

4.  Top with second crust; seal edge and flute.  Sprinkle with sesame seed.  Cut slits in several places in top crust.  Cover crust edge with 2-3” wide strips of foil to prevent excessive browning; remove foil during last 15 minutes of baking (I didn’t need it).

5.  Bake 30 to 40 minutes or until crust is golden brown.  Let stand 10 minutes before serving.

DSC_0001 Sorry I didn’t get a better picture, but we were running late with dinner and had to get started while the baby was sleeping!

Tuesday, July 26, 2011

Southwest Chicken Flat Pie

This is a variation on a million different recipes that I’ve tried before.  I like the pie crust – makes it a little different and was fun for my toddler.  She thought it looked neat and therefore ate it all up!  Also great because it’s most of the things that I always have on hand.  Recipe from Pillsbury.

Ingredients:

-1 refrigerated pie crust, softened as directed on box

-2 cups shredded cooked chicken

-1/2 cup salsa

-2 medium green onions, chopped (optional)

-1 Tbsp ground cumin

-1/2 tsp chili powder

-1/2 tsp paprika (smoked if you have it)

-1/2 tsp salt

-1/2 tsp pepper

-1/2 cup canned black beans, drained, rinsed

-1 cup shredded Cheddar cheese

-1 egg, beaten (can use or not – up to you)

Directions:

1.  Heat oven to 425 degrees.  Unroll pie crust on ungreased cookie sheet.

2.  In large bowl, toss chicken, salsa, green onions, cumin, chili powder, paprika, salt and pepper.  Spoon chicken mixture onto center of crust, spreading to within 1/5 inches of edge.  Top chicken mixture with beans and cheese.

3.  Fold crust edge over filling to make 1/5 inches border, pleating crust as necessary.  Brush crust edge with beaten egg.

4.  Bake 20 to 25 minutes or until crust is golden brown.  If necessary, during last 10 minutes of baking, cover crust edge with strips of foil to prevent excessive browning.  Let stand 5 minutes.  Cut like a pizza!

DSC_0244

LinkWithin

Related Posts with Thumbnails